If you're using a website built with Elementor, purchase buttons are typically assigned direct purchase links rather than parameters. If you're using the APSDAI payment system and need to add parameters like fixed payment method, language, or coupons, please follow these steps.
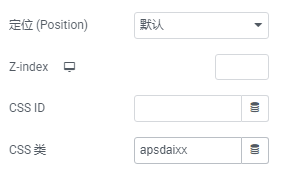
Step 1: Set CSS Class
Edit the button and switch to Advanced Settings; in "Layout" → CSS Classes, set a custom value (e.g., apsdaixx) for later use. When the mouse hovers over this button, it will change to a pointer state.
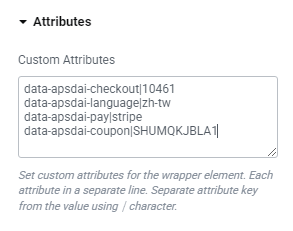
Step 2: Set Custom Attributes
In Attributes (Custom Attributes), enter the following to customize button functionality, one per line:
data-apsdai-checkout|10461- 10461 represents the product's Path valuedata-apsdai-language|zh-tw- zh-tw means Traditional Chinese popup, Simplified Chinese: zh-cn, English: endata-apsdai-pay|stripe- stripe means default to credit card payment, Alipay: alipay, WeChat: weChat, PayPal: paypaldata-apsdai-coupon|SHUMQKJBLA1- SHUMQKJBLA1 is a coupon available for this product. Users can directly apply this coupon without manual input (must be pre-configured in coupons)data-apsdai-open-type|cart- cart means clicking opens the shopping cart window, alternatively: paydata-apsdai-site|hk- Options: Hong Kong site (hk), China site (cn)
Step 3: Add Custom CSS
Add the following code in Custom CSS; where apsdaixx is the unique value you set for the button. After adding this, the cursor will change to a pointer when hovering over the button.
.apsdaixx {
    cursor: pointer;
}